After some time away from the work bench I have returned to the USS Weehawken. After weeks of looking at it, sitting there, mocking me as I mulled over ways to approach the armor plating on the deck, I finally decided to just dive in.
 I worked off of what few photos could be found on the internet of the actual monitor, photos of other monitor kits, and photos of models that others have built. I decided the brick-like layout that is most commonly depicted is probably the best bet, as there is little evidence against it. I started by drawing laying a pencil line down the center of the deck. Fortunately that was easy, as every line on the deck is either parallel or perpendicular to this line, so it had to be straight. I then marked off the perpendicular lines, continually checking them with dividers and a square. I decided the distance between them again by photo guesstimates, and by the fact that I have a ruler that is darn close to being as wide as measurements that I came up with.
 Next came out the scribing tool. I’ve never scribed anything on this scale before and it was daunting. I used a special tool that Squadron Hobbies produces (it looks like a particularly nasty dental scraper). It removes a fine ribbon of material on each pass, and after three passes on each line with the smaller head, it was done. The resin on this kit has more tiny airbubbles than I would like to see, and at points the tool did dig into pockets of them and cause irregular edges, but for the final “used” look I want for this model it wasn’t a deal-breaker.
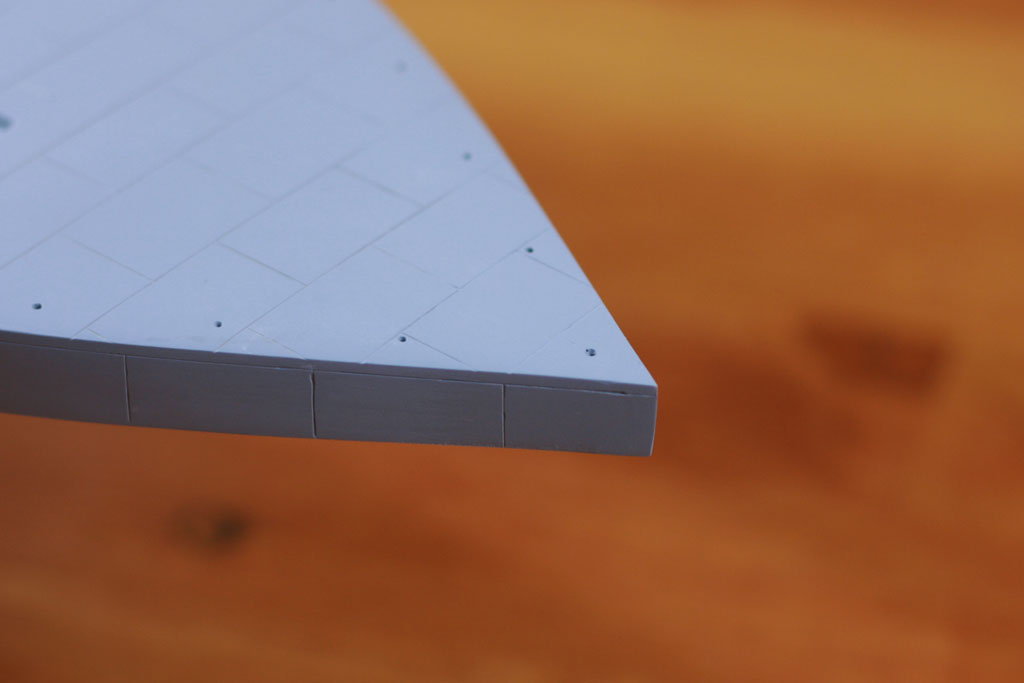
 After scribing those lines, out came the pencil and the straightedge and I began drawing in the alternating lines parallel to centerline, that run fore and aft. I continually checked my work with dividers to make sure I kept every resulting rectangle the same size. I’m almost positive this symmetry was not present on the real ships, but with nothing else to go on to contradict the pattern, I kept it as it adds a nice visual effect.
 I went with the assumption that the armor plates terminated at the very edge of the hull. They did this on the original Monitor, so why not? This meant I needed a line the thickness of the plates on the side of the hull. The blue tape is Dynamo label tape, from those old plastic label makers. It’s thick enough to provide a solid edge for the scribing tool to run along. I measured off the thickness of the plates to something that looks good and applied the tape. I don’t like to leave it on the model too long as it has a tendency to pull the primer from some of those air bubble areas on the hull, so I lay it down, scribe the line, and remove it.
Quite a bit of progress for only a weeks work, off and on. Now I have to figure out how to replicate the flush-faced rivets that are needed on the sides of the hull.
 Everyone knows that art is subjective. In the scale modeling world that has never been truer. Discussions as to whether building models is to be considered “art” or merely kit-assembly are as old as the hobby itself. Add into these discussions the variables of what materials were used, how much of the piece was scratch built by the modeler, the skill apparent in the final product, and one can see how this discussion can end in no single satisfactory answer.
 During the past month I’ve been traveling like I have the money to afford it. A week in Gettysburg (that I already covered) and three days at the yearly ReaderCon writer’s conference outside of Boston (that’s been covered so thoroughly on the ‘net that I won’t waste anyone’s time by recapping here).